

Read this manual carefully before use
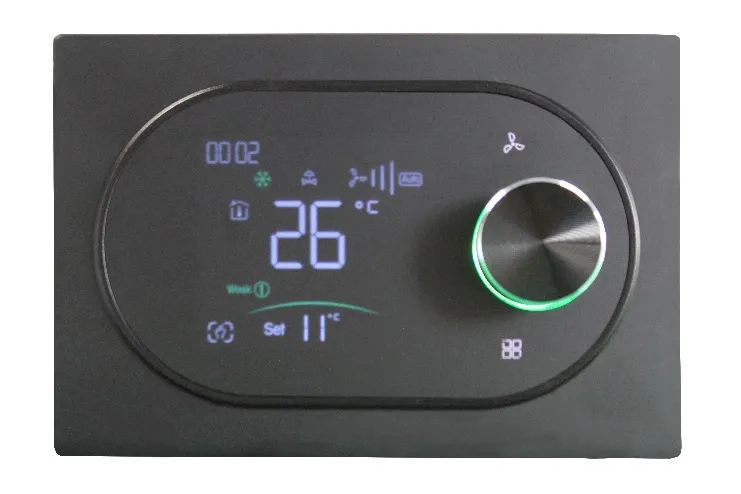
Image for illustration only.
About the thermostat
The Flunery smart thermostat series is designed to control your air-conditioning unit using the device itself or a dedicated app. Control fan speed, select modes (cooling, heating and ventilation), set a predefined weekly schedule, and connect to the Flunery cloud to manage energy consumption and detect faults.
Warnings
- Make sure this product is compatible with your air-conditioning equipment before starting installation.
- Before installation or maintenance, make sure the main power supply is switched off and the unit is disconnected from the electricity.
- Do not install the product in a damp or wet location.
- Follow the wiring diagram when installing the wires and electrical connections.
- Make sure the polarity (+ and -) is connected correctly according to the wiring diagram; a reversed connection may damage the device.
- When mounting on the wall, make sure the fasteners (screws/wall anchors) are suitable for the weight and structure of this product.
- Do not pull the cable forcefully; this may cause irreversible damage to the product.
- If a rigid electrical wire is used during installation, pre-bend it to the appropriate angle to prevent physical stress on the connections.
- Installation must be performed by a qualified electrician only.
- If the equipment malfunctions, contact customer service and technical support; do not attempt to repair the device yourself.
- After completing installation, review this manual again to perform a final check and make sure the device is used correctly and safely. Keep this manual in a safe place for future reference.
- Do not perform any action on the device that could change its wireless characteristics, including software modifications, replacing the original antenna, or adding the ability to connect an external antenna, without obtaining approval from the Israeli Ministry of Communications, due to the risk of wireless interference.
- External temperature sensor: use only a Flunery temperature sensor.
Package contents
- Thermostat: 1 unit
- Screws: 2 units
- User guide: 1 unit
Features
Design and appearance
- User-friendly touchscreen display: LED matrix lighting, a clean and simple display that is energy-efficient and easy on the eyes.
- Touch buttons: allow simple and easy operation.
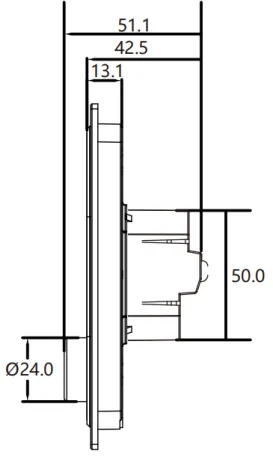
- Extra-thin recessed panel: fits perfectly with all types of walls. The visible thickness above the wall surface is only 12.4 mm.
- Frameless acrylic panel design: a simple, clean and elegant look.
- Classic color combination: blends smoothly and cleanly into any space.
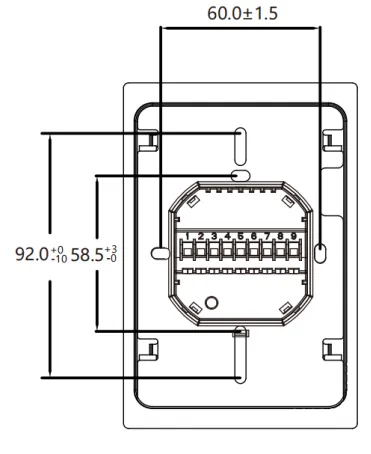
- Wide compatibility with wall boxes: fits Israeli 3-module / square 86*86 mm / European round 60 mm boxes, for a perfect fit in any installation environment.
- Simple interlock mechanism: allows an especially convenient and quick installation.
Functionality
- A variety of options and protocols: supports Wi-Fi, key card and more, to meet all your needs.
- Temperature control: accuracy of °C ±1 to provide the desired level of comfort.
- Power-failure protection: internal memory retains the settings even in the event of a power outage.
- Predefined weekly schedule: allows programming of 6 different time periods per day. Enables energy savings (“green energy”), cost reduction, smart management and environmental protection.
- Support for creating local groups and sharing devices: allows central control of multiple devices at once, and management from several different terminals/phones.
- Full integration with voice assistants: full compatibility with Google Home, Amazon Echo and Tmall Genie for an advanced voice control experience. (Optional on selected models)
Technical data
- Power supply: 95 ~ 240V AC, 50 ~ 60Hz or 12V DC
Check the information printed on the back of the thermostat to verify the actual voltage before installation.
- Fan relay current: resistive load: 5A; inductive load: 3A
- Valve relay current: resistive load: 3A; inductive load: 1A
- Temperature setting range: 5 – 45 °C
- Accuracy: °C ±1
- Display temperature range: 5 ~ 99 °C
- Operating ambient temperature: 0 ~ 45 °C
- Allowed ambient humidity: 5 ~ 95% RH (non-condensing).
- Storage temperature: -5 ~ 45 °C
- Timing error: < 1%
- Self power consumption: < 1.5W
- Housing material: PC + ABS (fire-resistant).
- Wall box: Israeli 3-module / square 86*86 mm / European round 60 mm.
- Protection rating: IP20
- Buttons: touch buttons
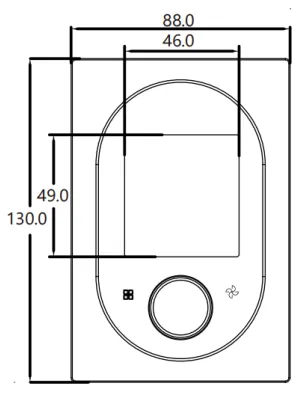
Dimensions (mm)
Digital display
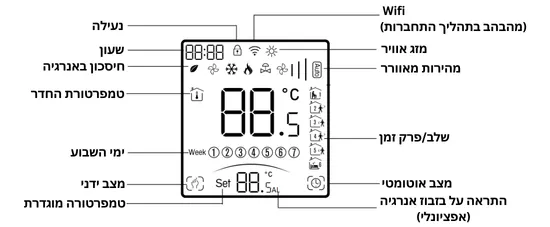
Display icons: lock, clock, Wi-Fi (flashes while connecting), weather, energy saving, fan speed, room temperature, time period, days of the week, manual mode, automatic mode, target temperature, energy waste alert (optional).
Fan speed


Modes: cooling, heating and ventilation

Note: weather data first syncs within one hour of the device connecting to the internet, and then updates automatically every hour on a regular basis.
Before wiring and installation
- Read these instructions carefully. Failure to follow the guidelines may damage the product or lead to a dangerous situation.
- Check the data and ratings shown in these instructions and on the product itself, to make sure the product is indeed suitable for your application and system.
- The installer must be a qualified electrician.
- When installation is complete, check the operation of the product as detailed in these instructions.
Caution
Risk of electric shock or damage to the equipment.
Disconnect the main power supply before starting installation!
In the event of a malfunction, disconnect the power supply before handling the fault.
Wiring
Important: check the laser-printed information on the back of the thermostat to verify the actual supply voltage.
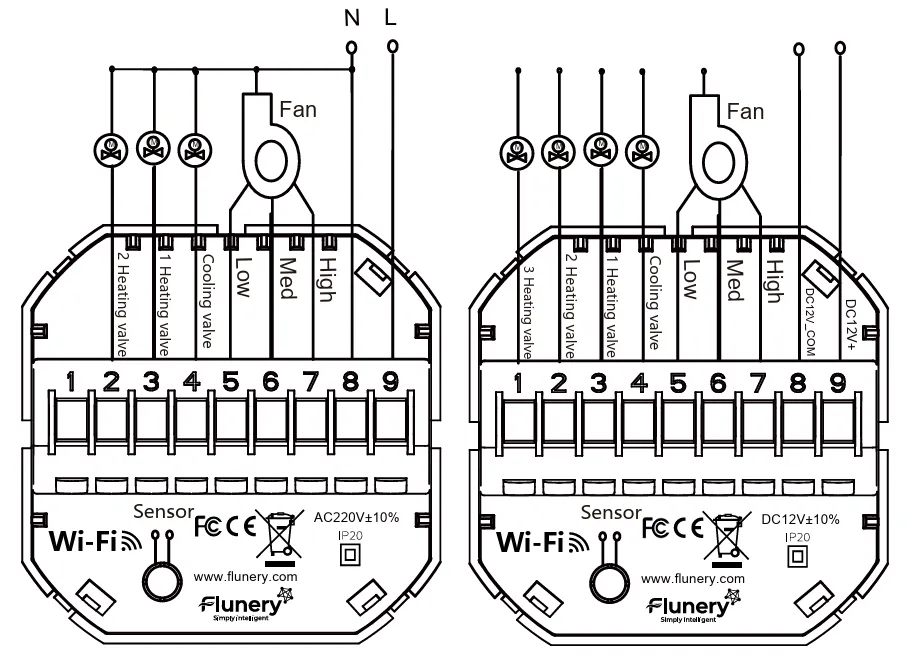
12V DC / 95 ~ 240V AC, 50 ~ 60Hz
Installation
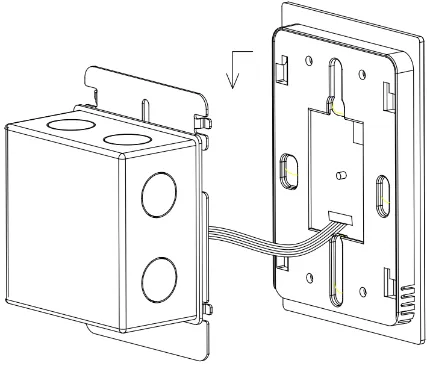
Your thermostat is suitable for installation inside a standard wall box.
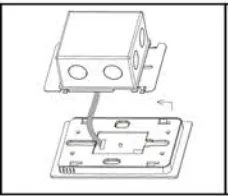
Step 1: Separate the top panel from the bottom panel (separate the display panel from the base unit). Step 2: Connect the power cable (mains voltage) and the equipment cables (fan and valve wiring).
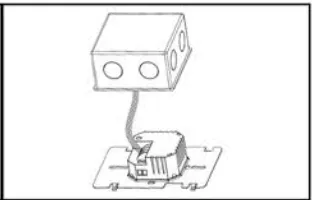
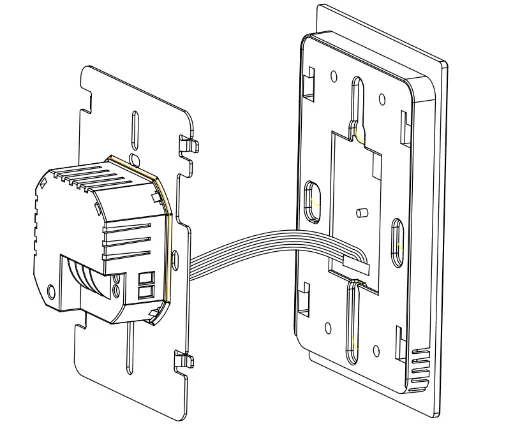
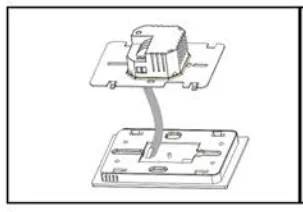
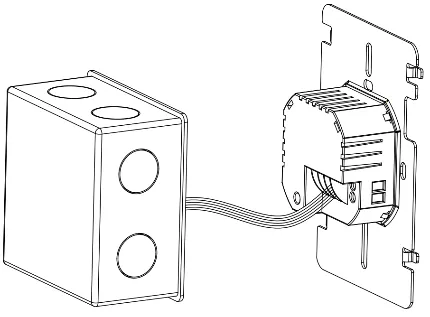
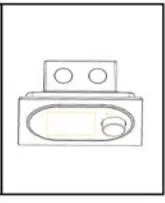
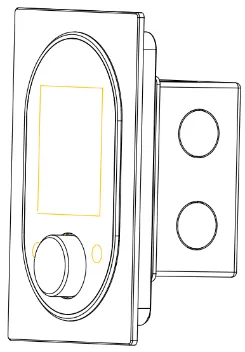
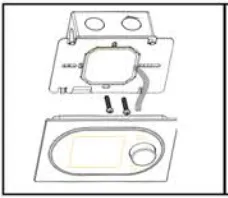
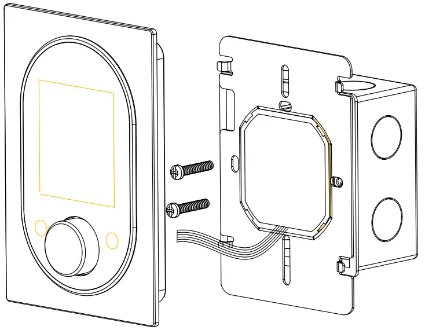
Step 3: Position and tighten the screws into the wall box. Step 4: Attach and secure the front display panel to the base plate. Step 5: Tighten the screws for a stable fit.
Operation
While the device is on
On/off: Press the central dial to turn the thermostat on or off.
System mode selection: Press the mode button
to switch between the different system modes: heating, cooling and ventilation. In cooling mode, when the valve closes the fan continues to run. In heating mode, the fan turns off about half a minute after shutdown.Manual mode and programmed automatic mode: Press the mode button
briefly, then press and hold it for 3 seconds. The hand and clock icons  will flash on the screen. Now turn the control dial left to switch to programmed automatic mode, or right to switch to manual mode.
Temperature setting: In manual mode, set and change the target temperature by turning the control dial.
Fan speed setting: Press the fan button
 to select the desired fan speed: automatic, high, medium or low.
Setting the clock: Note: the Wi-Fi version automatically syncs the local time as soon as it connects to the internet. Press the mode button
briefly, then press and hold it for 3 seconds. The hand and clock icons will flash on the screen. Press the mode button briefly again — the hour digits of the clock will flash; turn the control dial to set the desired value. Press the mode button again and turn the control dial to complete and set the minutes and the day of the week.Setting the programmable weekly schedule: On the Wi-Fi version, you can set and manage the weekly schedule easily, directly through the app. Press the mode button
briefly, then press and hold it for 3 seconds. The hand and clock icons will flash on the screen. Press the mode button briefly, 4 times in a row, to enter weekly schedule setting mode. At this point, the screen will show the workdays (①②③④⑤), the “minutes” digits of the time will flash, and the icon for the first time period  will appear.
Press the mode button
again to switch between and select the time, temperature and time period settings. Turn the control dial to adjust the desired value at each step. In the same way, complete the target time and temperature settings for time periods (steps) 2 through 6.
Default schedule settings
You can set a separate schedule for weekdays and for weekends.
Note: the device is set according to the international weekend (Saturday and Sunday).
| Time | Hours | Sunday | Monday | Tuesday | Wednesday | Thursday | Friday | Saturday |
|---|---|---|---|---|---|---|---|---|
| Time 1 | 6:00 | ON | ON | ON | ON | ON | ON | ON |
| Time 2 | 8:00 | ON | ON | ON | ON | ON | ON | ON |
| Time 3 | 11:30 | ON | ON | ON | ON | ON | ON | ON |
| Time 4 | 13:30 | ON | ON | ON | ON | ON | ON | ON |
| Time 5 | 17:30 | ON | ON | ON | ON | ON | ON | ON |
| Time 6 | 22:00 | OFF | OFF | OFF | OFF | OFF | OFF | OFF |
- Locking the thermostat: Press and hold the and buttons simultaneously for 5 seconds to lock or unlock the thermostat.
Warranty and service: The thermostat comes with a 12-month warranty from the date of purchase. Service beyond the warranty period may be chargeable. Contact customer service for more details.
App connection guide
About the Wi-Fi connection
Before using the thermostat for the first time, set up the Wi-Fi signal and the various settings using your smartphone or tablet. This enables full communication and synchronization between your devices.
Step 1: Downloading the app

Search for the “Smartlife” app in Apple’s App Store or Google Play, or scan the QR code above.
Then complete registration and setup according to the instructions in the app.
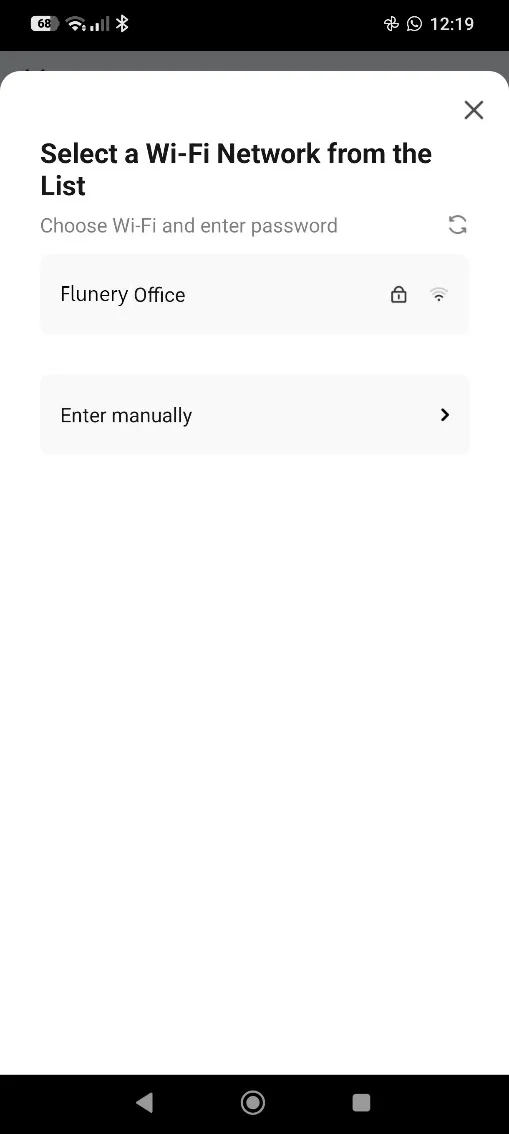
Step 2: Connecting the thermostat to the network
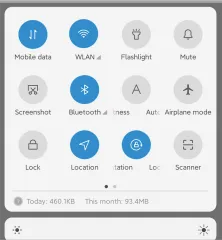
Turn on the Wi-Fi switch on your mobile phone.
Put the thermostat into Wi-Fi pairing mode:
With the thermostat off, press and hold the
 button until the Wi-Fi icon flashes on the thermostat’s screen, then continue following the steps in the app.
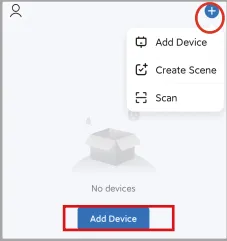
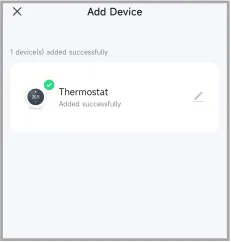
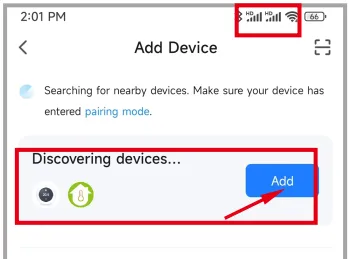
Open the app, press “Add Device”, and follow the instructions to complete the connection.
Note: the device only supports Wi-Fi networks on the 2.4 GHz band. When entering the network password, make sure you select the matching band on your home router.
App interface overview
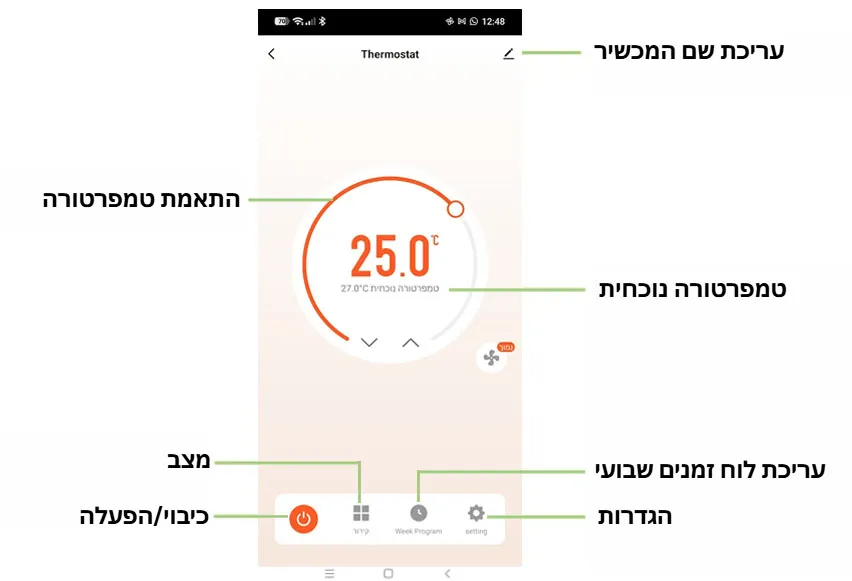
After connecting, the management interface in the app lets you perform the following actions:
- Editing the device name: change the device name (for example: “Meeting room thermostat”).
- Adjusting the temperature: set the desired target temperature in the room.
- Mode: change the operating mode (cooling, heating, ventilation).
- On/off: turn the thermostat on and off remotely.
- Editing the weekly schedule: set a weekly schedule with fixed times of day.
Troubleshooting
| # | Symptom / Fault | Suggested action |
|---|---|---|
| 1 | The device is connected to power, but the screen remains completely off. | Check whether the connections between the LCD panel and the power unit box are loose. |
| 2 | The display and screen work normally, but there is no heating output. | Check that the power unit is functioning correctly, or replace it with a new one if necessary. |
| 3 | The displayed room temperature differs slightly from the actual temperature. | Perform a temperature calibration through section 1 in the app’s advanced settings. |
R&D: Flunery Ltd, 10 Bazel St, Petah Tikva 4951005